Average Reviews:

(More customer reviews)I will preface this review by saying I am not a die-hard audiophile who's interested in the schematics of the circuit boards inside, and how discreet they are, and whether or not they use premium toroidal coils and all that other stuff. I merely like watching blu-ray movies, playing hi-def video games, listening to music, and making the whole experience sound good. So with that in mind if you're looking for an in-depth analysis of the output of this unit using reference loudspeakers that each sell for the price of a baby grand piano, you might want to search for a different review. ;)
It took a while for me to write this review. Mainly because this is one seriously complex piece of equipment. It's got more connections, more buttons, and more overhead with regards to setup than my home computer network. Don't let this scare you away though, it is an absolutely outstanding receiver. I'll try to relay the experience I've had with it so hopefully you can get some value from reading my wall of text review.
My setup:
I'm not using any spectacular speakers for this. I've got a somewhat hodge-podge of KLH for surround speakers, Panasonic for the rear channels, and a large sub I've had for years and don't recall the brand (it's a 10" sub though.) My main interest was putting together a system that would sound immersive, and not necessarily give a crystal-clear reproduction of the source material (again - not an audiophile, just your average listener.) This is why I didn't bother spending thousands on speakers, and chose to use what I had from my old 5.1 system. The receiver is paired with a Samsung 48" LED LCD TV. For Blu-ray and games I've got a PS3, as well as an Xbox 360, a PS2, and a Nintendo Wii. For cable I have a Comcast HD DVR. The TV, PS3, Xbox 360, and HD DVR are all hooked up with HDMI cables. The Nintendo is using RGB RCA connectors.
Ok with that out of the way, I'll move on to what I went through after unboxing this thing.
Initial setup:
Connections -
This is where the confusion starts. It's a 7.2 receiver, but it's has *more* than 7 channels that can be hooked up to it. However it can only output 7 channels at a time, and this is why it's labeled as 7.2. I believe the ".2" stems from the fact that it's got dual sub channel outputs, for people who think one subwoofer is not enough. Looking at the connections this thing has is intimidating. It's got an unbelievable amount. HDMI, component, S-video, composite, USB, 11 connectors for speakers (YES - ELEVEN!), subwoofer connections, low level audio outputs, antenna connectors, coaxial connectors, serial port connector, optical connectors, a CAT-5 cable input to hook the thing up to the internet/world wide web, and other connections that I don't even know what their purpose is. WHEW!
Tackling the manual clears some of these things up, to a degree. When you're making your connections you will notice that inputs are grouped according to their suggested purpose. An example is the Cable/Satellite section. It has an HDMI input, component video inputs, an S-Video input, composite video input, coaxial audio input, and two RCA inputs for audio (left/right). Not all groups have this many, and some have different options such as "Game" - it has an optical audio connection. This is for flexibility. You'll want to use the best inputs your device supports to get the best results, of course. It would be silly to have a nice DVD player with component output and optical audio and hook it into the receiver using composite and RCA audio connections. So with that in mind, stick to the best outputs on your devices, and you'll have to play around with what makes the most sense with your gear. I would highly recommend putting this all down on paper before you start plugging everything in, otherwise you'll wind up going back and shuffling things about when you find out what you were doing won't work.
The way the unit chooses which input to use is through the on-screen display in the setup menu. Inside of it you can decide which group uses which input. The caveat is you cannot do something like hook in a blu-ray player to the Game group's HDMI input, then use an Xbox 360 component output on the Game group's component input. One input per group. This is why planning ahead is important to avoid this mess. Hopefully this clears up a bit about hooking devices up. I don't want to go into more detail, because if I did this review would be more massive than it already is going to be!
MY RECOMMENDATION FOR SPEAKER LAYOUT: This is COMPLETELY subjective. You may find that your preferences differ. My goal was immersion when watching movies or playing games. You're "limited" to having 7 surround speakers active at a time. The receiver supports some very funky layouts and surround-sound encoding. The speaker positions it supports are: center channel, left and right, WIDE left and right, HEIGHT left and right, surround left and right, and rear channel (either rear left and right, or just a single rear speaker.) If you have a huge room and the money, there's nothing stopping you from hooking up every single output to speakers. Just remember - the system will only drive 7 powered channels at a time. The channels that are driven are decided by either you, or the source material you're playing. Since I don't have tons of money or a huge room to hook up all the speakers, AND from experience I've whittled down my speaker position preferences: I went with center channel, left/right, surround left/right, and rear left/right. This (in my opinion) offers the best experience and most immersion. When you play back media which supports 7.1, it sounds AMAZING. Stuff moves behind you. To your sides. And in front from left to right. You can literally hear things flying in a circle around you. I tried out the height position just to see what it sounded like... wasn't even really noticeable at all, and a complete waste. I have not tried out the wide left/right as my room doesn't have the space to support it.
On-screen menus -
I will touch on these lightly as there are simply too many menus, sub-menus, and sub-sub-menus. The most important ones are setting up the speakers, mapping inputs, and setting up the surround modes for each source. Start by setting up your speakers by going into the Speaker Setup/Speaker Configuration menu. Step through each speaker pairing and choose a frequency to cut off at, or set the pair to OFF if you don't have speakers in that position. Next go to the Input/Output Assign menu and step through each source you have and select the input it uses (this is where you choose, for example, if your game console uses the HDMI input or the component input, etc., depending on which input you plugged it into) Last you will want to set the Listening Mode Preset for each source. The last step can be confusing since there is a myriad of choices to choose from. I've typically found that for sources which can output different surround modes that selecting DIRECT for all modes is the best except for 2 channel signals - then it's up to your preference on what listening mode to choose. "Direct" allows the source material to select the surround mode to use, so you hear media the way it was meant to be heard. If you force a surround sound mode, the receiver does some fancy processing of its own to simulate the chosen surround sound mode, which will not be the way it was recorded. For sources that do not have multiple surround modes (for instance a VCR), it's up to your set up and listening preferences as to the surround mode you choose (my preference based on my set up is PLIIx THX Cinema for almost all sources that don't have the ability to play back in a surround mode.) I'd go through all of them while listening to your source material, and make your selection based on what you think sounds the best.
There are some other items, such as choosing how far apart your speakers are, and naming your inputs more accurately, but again trying to keep this review as minimal as possible here (too late!)
USE:
The remote. Lots of choices, and some odd groupings. There are two different groupings with regard to your sources. One group selects the input you wish the receiver to play from (Cab/Sat, Game, etc.) and the other chooses the mode the remote is in (TV, Receiver, etc.) The latter is so the remote can control the device. You can press TV for instance, and if you have a TV that can be controlled via the Onkyo remote, then you're in luck and can operate most of the TV via this one remote. The remote could be laid out better. Given how complex the receiver is, it's not too surprising the remote is so cluttered.
The cool factor. Look, you can hook the thing up to the web. Why would you want to do that? Because it supports streaming audio over the web, that's why! Whether you set it up to stream from your Windows PC, or directly off the web with Pandora/Sirius/V-Tuner, it's worth it. I have some very strange taste in music, and when I went on the web with the receiver using V-Tuner (which is free with your Onkyo by the way) I found dozens of obscure stations that played back exactly what I like. If *I* can find music on there that I like, I almost guarantee you that you'll have no problems finding hundreds of stations to listen to. It's simply awesome.
On screen display. For menus it's very nice to have them displayed on your HDTV instead of the tiny LED screen on the Onkyo. Makes menu options much easier to scroll through and select.
Video. Setting up the video can be confusing, especially when it comes to mixing HD 16:9 sources with standard 4:3 sources. All the different stretching and zooming modes to squish or pull a 4:3 source so it looks good on a 16:9 wide screen HDTV is a pain. I don't...Read more›
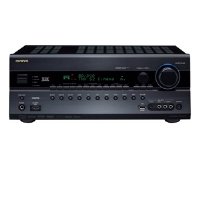
Click Here to see more reviews about: Onkyo HT-RC270 7.2-Channel Network A/V Receiver (Black)
If you're ready to take your first step into the world of networked home entertainment, let the HT-RC270 be your guide. This versatile A/V receiver sports a handy Ethernet connection that lets you enjoy streaming PC audio and internet radio in the comfort of your living room. When it comes to connectivity, the HT-RC270 handles virtually anything you throw its way. You get six 3D-ready HDMI 1.4a inputs (one on the front-side); 7.1-channel analog audio inputs for legacy components; analog RGB inputs for PC video; a Universal port for Onkyo peripherals; and a front-side USB input for Pod models and flash memory devices. Onkyo has a well-earned reputation for bringing advanced audio features to a wider audience. In the case of the high-value HT-RC270, that means low-jitter Burr-Brown DACs; lossless HD audio from DTS and Dolby; Audyssey MultEQ room-correction; and the expanded surround dimensions of Audyssey DSX and Dolby Pro Logic IIz. All of this connectivity and processing power earns the HT-RC270 the quality assurance of THX Select2 Plus.
 Get 33% OFF
Click here for more information about Onkyo HT-RC270 7.2-Channel Network A/V Receiver (Black)
No comments:
Post a Comment